Creating Collections
Step 1: Staging the Collection
A Collection may be created or “staged” at any time. Staging the collection means you are defining a digital container to eventually fill with the information you wish to record to a blockchain record.
- Typically a Collection will be built within an Issue workflow. However, buttons to Stage New Collection can also be found in the Assets and Collections tabs in the app.
- After initiating a new Collection you will be prompted to provide a unique name. Duplicate names will not be permitted.
- Select Stage Collection to complete the staging process.
- At this point you may continue to Step 2 or you can leave the Collection workflow for completion at a later time. It will be listed as an Open Collection under the Collections tab.
Staged Collections are not yet recorded on blockchain. All steps must be completed to create the blockchain record of the Collection.
Step 2: Adding Assets to the Collection
Once a Collection is staged it is ready to have Assets added. Assets can be added and removed as much as needed in this step. Additionally, there is no limit to the number of Assets that can be added.
- If the staged Collection is not open already, go to the Collections tab and select the Collection from the list of Staged Collections at the top of the page.
- Select the Add Versions button.
- You will also notice a Delete Collection button. This option is only available up until you Record the Collection at which time the information will be permanently recorded on chain.
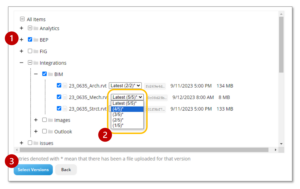
- On the next screen you will be provided with three options to for adding Assets. These are:
- Select from Registered Versions – this will access all of the Assets already registered and visible on the Overview tab. If an Asset has multiple versions you will be able to select from any of the available versions using the pulldown menu in the dialog box (below).
- Add Files from Your Computer – this will access your system file directory so that non-registered file may be added. The selected file(s) will be automatically registered as Assets when selected.
- Drag and Drop – this is identical to the previous process with the exception that files are dragged into the target area instead of being selected from a file directory.
- Select from Registered Versions – this will access all of the Assets already registered and visible on the Overview tab. If an Asset has multiple versions you will be able to select from any of the available versions using the pulldown menu in the dialog box (below).
Assets for a Collection may be assembled using one or all of these methods.
Assets may be added and removed using the Add Versions and Remove Versions buttons as needed to refine the list of Assets until you are ready to move to Step 3.
Step 3: Recording a Collection
Once you have selected the Assets you wish to commit to the Collection is is time to record the blockchain record.
- If the staged Collection is not open already, go to the Collections tab and select the Collection from the list of Staged Collections at the top of the page.
- Select the Record Now button. This will open a new page to confirm the Assets and commit to creating the record. Select Record Now the second time. to confirm your decision.
Green buttons mean that the action taken is recording information to the public blockchain and cannot be changed.
- Concert now writes the blockchain information. The transaction process can a few seconds or up to an hour to complete. During this time it is okay to navigate away from the Collection page or even close Concert. A notification will be transmitted once the transaction is complete.
Step 4: Verifying a Collection and More
Once the blockchain transaction is complete the Collection will move from the list of Staged Collections to the Created Collections list on the Collections tab.
Opening the Collection presents the full record information record and enables useful functions such as:.
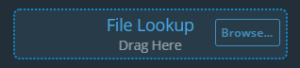
- File Lookup – any asset recorded will be associated with and can be validated against this Collection. Just drag and drop a copy of the asset to the File Lookup function at the top of the webapp.
- Print Attestation – provides a document of the record for printing or sharing as a PDF.
- Signature Request – apply a digital signature to the record to certify the recorded data as a legal document
- Distribution – start an Issue workflow to share the Assets and collaborate with project stakeholders